Printing the Calibration Boards
The easiest option to get the calibration boards is to buy the boards pre-printed at high resolution on a hard surface from oARo, in which case you can ignore this page.
If you want to customize your board sizes, or don't want to pay or wait for shipping, it is however possible to print the boards yourself. There are a few things to be wary of and options in EZprofile to help you use your non-official boards.
1. Boards as image
This is the more customizable and precise option if using a professional printing service.
Go to the installation folder .../oARo/ezprofile/Documentation/Boards
The default size of each board is given in boards.txt.
| Board Name | Width | Height | Tag Side Size |
|---|---|---|---|
| A | 28.80 cm | 20.40 cm | 18 mm |
| B | 28.80 cm | 20.40 cm | 9 mm |
| C | 48.00 cm | 34.00 cm | 25 mm |
| D | 48.00 cm | 34.00 cm | 12.5 mm |
| E | 76.80 cm | 54.40 cm | 40 mm |
| F | 76.80 cm | 54.40 cm | 20 mm |
| optional situational boards | |||
| very wide angle lens | |||
| G | 76.80 cm | 54.40 cm | 75 mm |
| H | 76.80 cm | 54.40 cm | 50 mm |
These sizes cover most of the pratical range of common broadcast and prime lenses.
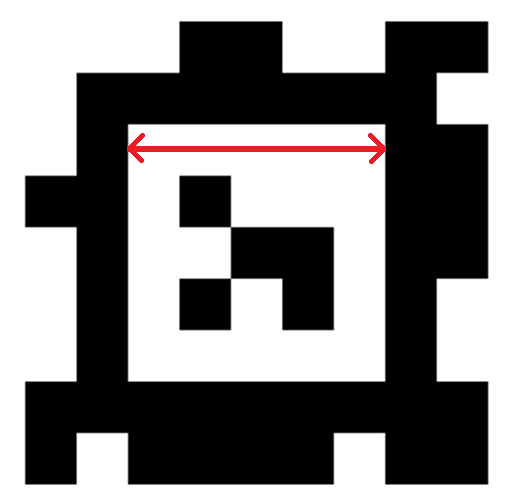
The Tag Size is the length of the side of the inner square in millimetres, like illustrated below:
For those interested in customizing their boards
The images can not be changed as they are used for recognition in the software to know the position of each tag in the board space. You are therefore limited to using this set of images. You can however customize the size of each board. For exemple in the default set, boards A, C and E are very similar, the main difference is the scale of the image. Because of image resolution it is recommended to follow the same order as us: A,B are the smallest and E,F the biggest.
Danger
The printed board must have the same aspect ratio to keep the tags square. There can be unwanted distortion and stretching if printing with standard parameters. Make sure to check the tags are square after printing and adjust the parameters of your printer if they are not.
2. Boards as PDF
We also have the boards exported to PDF in the closest common paper format of both the international ISO 216 standard and North American standard. Ask your oARo contact if you would like to get them.
These are useful for printing the boards yourself with consummer grade printers.
Danger
Make sure the tags are square after printing and measure them. The printer might have applied a scaling. If the tags are square but not exactly the same size as default, just change the size in EZprofile.
3. Printing Recommendations
- The board should be fixed on a straight hard surface, without bumps, folds or warping.
- If you really can't get a hard flat board, glue it streched and flat on a wall and move the camera. This is much harder and time consuming than the standard workflow.
- The sharper the printing resolution the better, until 300dpi.
4. Configure sizes in the software
After printing your boards, you need to measure them and create a preset for them in EZProfile.