Live Tracking in Unreal Engine 4 & 5 with the EZtracking plugin
| Plugin Version 1.4.1 | Unreal supported versions 5.3.1 / 5.2.1 / 5.1.1 / 5.0.3 / 4.27.2 |
The EZtracking plugin helps you to connect live tracking data to your project.
Installation
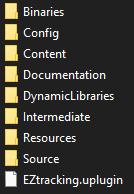
- Copy the EZtracking folder into the Plugin folder of your project (if the Plugin folder does not exist, create it). The EZtracking folder should should have the following structure:
- Open your project and check if the plugin is Enabled in Edit > Plugins > Installed > Virtual Production
Quick Start
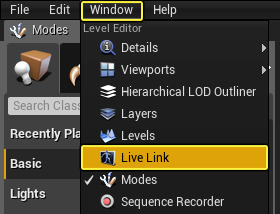
- Open the Live Link window
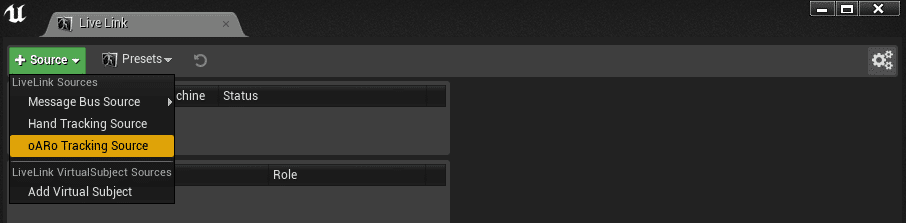
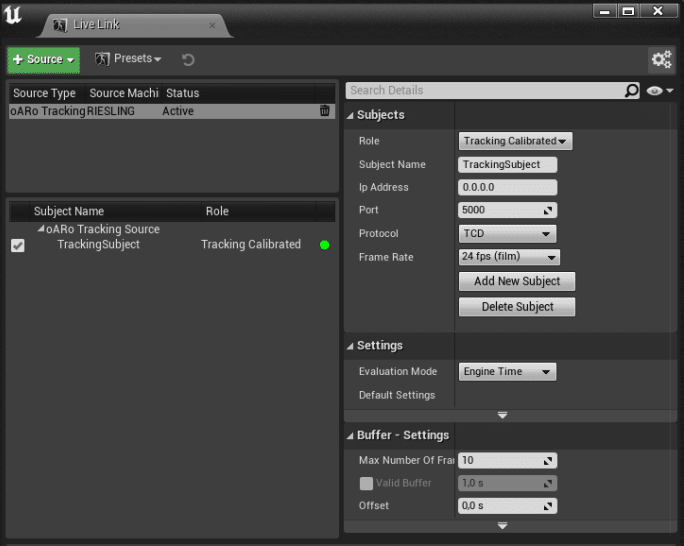
2. Create a oARo Tracking Source
3. Set the Port according to the sender of the tracking data and click on Add New Subject

4. Once the subject is created, the status led should be green if data is received
- Then add a Cine Camera Actor to your scene.
- Click on the newly created Cine Camera Actor, then on Add Component in the details window, and select a Live Link Tracking Controller.
- Click on the Live Link Tracking Controller, and in Subject Representation, select the Freed Subject previously created
If Realtime is enabled in the Viewport Options, you should see the camera moving accordingly to the live tracking data received. Otherwise click Play.
Reference
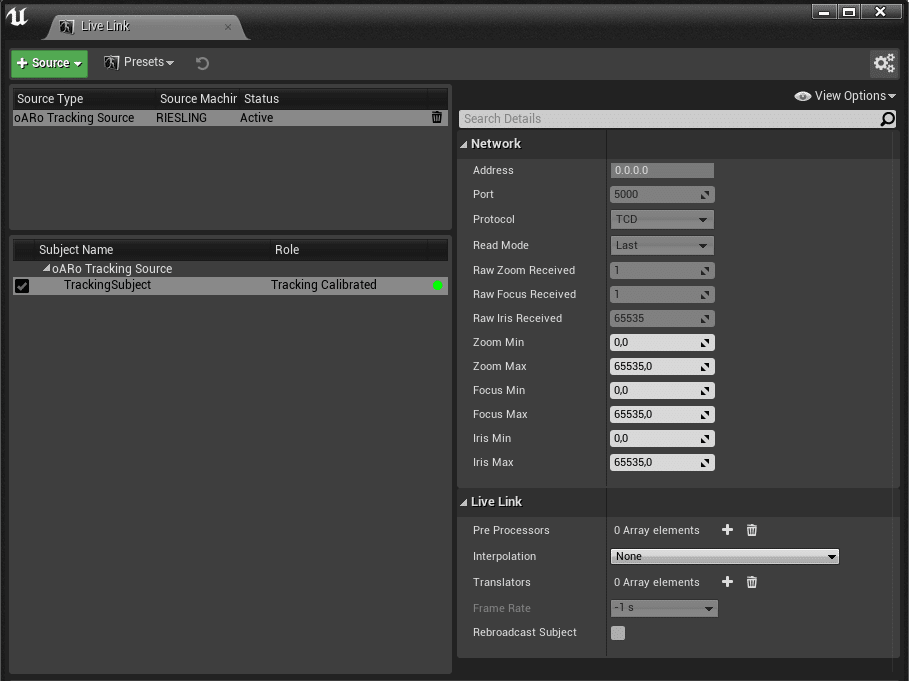
Live Link Window
Live Link Source
• Role : How incoming data should be used. Supported roles are:
Tracking Calibrated : Incoming data is translated into transform, normalized zoom / focus / iris values, calibration data and various information from the lens / camera / tracking source.
Tracking : Incoming data is translated into a transform and normalized zoom / focus /
iris values.
Camera : To drive a camera with a transform and lens values.
Transform : Incoming data is translated into a transform only.
• Subject Name : The subject name. Each subject must have a different name.
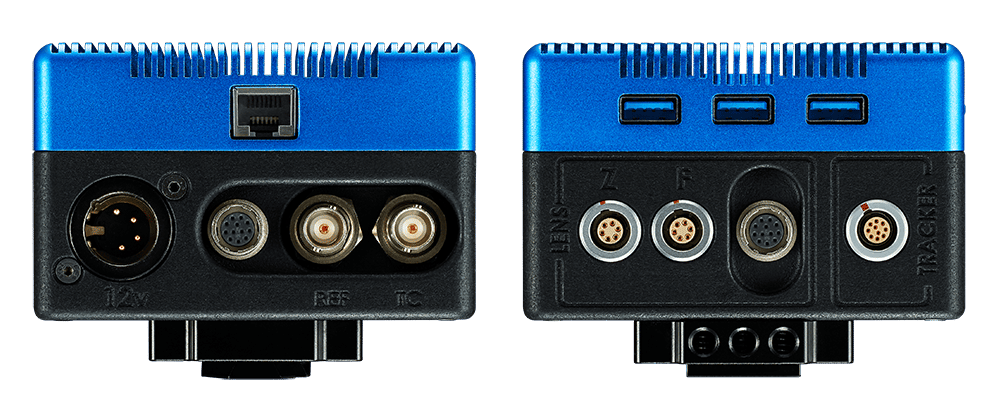
• Ip Address : The IP address of the network link receiving the tracking data (usually the
computer IP if it has only one card).
• Port : The network port to open to start receiving data. Check the settings of the tracking
data sender.
• Protocol : The network protocol used to decode the incoming data. Available FreeD or
TCD.
• Add New Subject : Create a new subject with the above settings.
• Delete New Subject : Delete the subject whose name correspond to Subject Name.
Live Link Subject
• Zoom Min : Minimum value for zoom data received, used to normalize the zoom value.
• Zoom Max : Maximum value for zoom data received, used to normalize the zoom value.
• Focus Min : Minimum value for focus data received, used to normalize the focus value.
• Focus Max : Maximum value for focus data received, used to normalize the focus value.
• Iris Min : Minimum value for iris data received, used to normalize the focus value.
• Iris Max : Maximum value for iris data received, used to normalize the focus value.
If the role is Camera , an additional parameter is displayed.
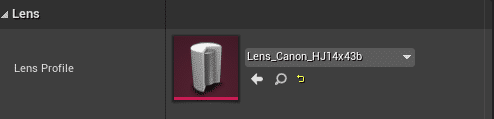
• Lens Profile : Select a Lens Profile asset to convert the zoom and focus values received
into focal length and focus distance.
Blueprints
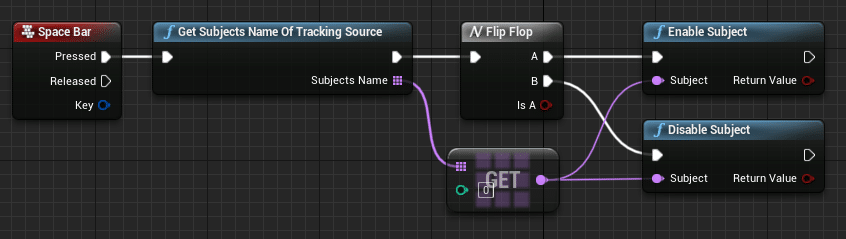
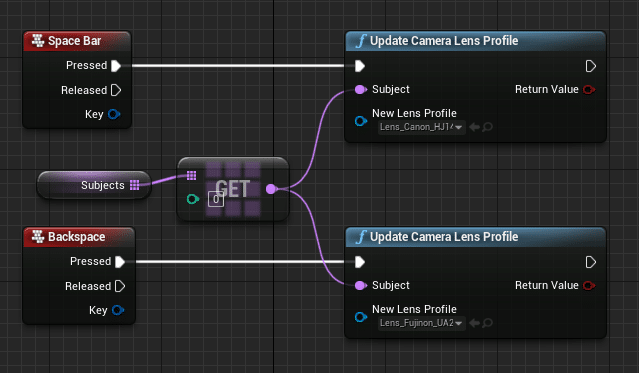
Blueprints can be used to configure subjects.
• The blueprint functions expect a subject name to set the corresponding subject. The list of detected subject names can be retrieved using:
• Tracking subject can be enabled / disabled:
• The lens profile can be updated:
Config file
Default values can be set in the file EZtracking\Config\DefaultEZtracking.ini
Live Link Tracking Controller
Live Link controllers provide a quick method of taking Live Link data and pushing it to an Actor in
your scene.
Setup
Once a Live Link Component Controller is added to an Actor, a Live Link subject must be selected in the field Subject Representation. Depending on the role of the subject, the corresponding controller is applied.
Tracking Calibrated Role
LiveLink Tracking Calibrated Controller
The settings on this controller are:
Tracking
The Tracking frame data. Read-only.
Tracking Role
There are two controllers supported for this role: LiveLink Tracking Camera Controller and
LiveLink Tracking Transform Controller . It can be changed onto the field Role Controllers > Live Link Tracking Role .
Transform Tracking
• Transform Delay : Synchronize the data with the engine by delaying the data received by this number of frames.
• Scale Transform : Scale the Location of the Transform.
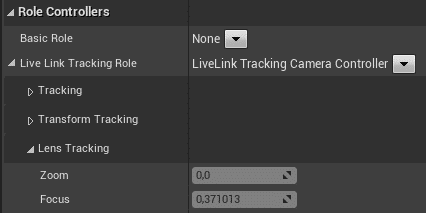
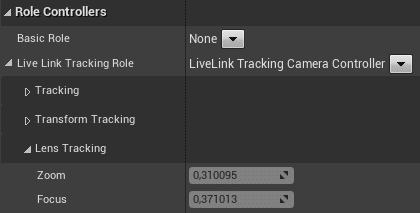
Lens Tracking
This section are only available if the owner of the Live Link Controller is a Cine Camera Actor.
• Aperture : Aperture of the Cine Camera Actor in terms of f-stop.
• Focal Driven by Fov : Select if the field Fov or Focal drives the focal length of the camera.
• Fov : Field of View of the Cine Camera Actor in degrees.
• Focal : Focal length of the Cine Camera Actor in mm.
• Focal Factor : Multiply the focal by this factor. The factor is applied if the focal is set directly or computed from the field of view.
• Focus Distance : The focus distance of the Cine Camera Actor in cm.
• Nodal Offset : The nodal offset of the optical system, from the sensor, in cm. This settings adds a relative offset on the X axis to the Cine Camera Actor.
• Sensor Width : The width of the sensor in mm.
• Sensor Height : The height of the sensor in mm.
Advanced section
• Enable Dof : Enable or disable the Depth of Field simulation on the Cine Camera.
• X from Tracking : If disabled, allow to manually update the setting.
Blueprint
Data can be accessed through blueprint.
LiveLink Tracking Camera Controller
The settings on this controller are:
Tracking
The Tracking frame data. Read-only.
Transform Tracking
• Transform Delay : Synchronize the data with the engine by delaying the data received by this number of frames.
• Scale Transform : Scale the Location of the Transform.
Lens Tracking
Most of the settings in this section are only available if the owner of the Live Link Controller is a Cine Camera Actor.
• Zoom : The live zoom value received, normalized between [0; 1]. Negative value means nothing has been received yet.
• Focus : The live focus value received, normalized between [0; 1]. Negative value means
nothing has been received yet.
• Zoom Delay : Synchronize the zoom and focus data with the engine by delaying the data received by this number of frames.
• Use Lens Profile : If enable, a lens profile is used to get Fov, Focus distance, Nodal offset, K1, K2, Cx, Cy, Sensor Width, Sensor Height from the Zoom and Focus data received.
• Lens Profile : Only available if Use Lens Profile is enabled, this is the data asset used.
• Focal Driven by Fov : Only available if Use Lens Profile is disabled. Select if the field
• Fov or Focal drive the focal length of the camera.
• Fov : Field of View of the Cine Camera Actor in degrees.
• Focal : Focal length of the Cine Camera Actor in mm.
• Focal Factor : Multiply the focal by this factor. The factor is applied if the focal is set directly or computed from the field of view.
• Enable Extra Fov : The distorted picture may need a wider original FOV to avoid loosing pixels. If this setting is enabled, the fov is multiplied by the Scale factor.
• Scale : Only available if Enable Extra Fov is enabled. A multiplicator for the Field of View, before distortion.
• Focus Distance : The focus distance of the Cine Camera Actor in cm.
• Nodal Offset : The nodal offset of the optical system, from the sensor, in cm. This settings adds a relative offset on the X axis to the Cine Camera Actor.
• K1 : The Quadratic coefficient for the radial distortion. See Lens Profile section for more information.
• K2 : The Quartic coefficient for the radial distortion. See Lens Profile section for more information.
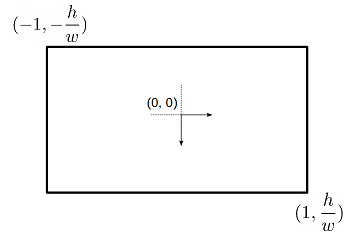
• Cx : The Center Shift on X axis in percentage of the picture.
• Cy : The Center Shift on Y axis in percentage of the picture.
• Sensor Width : The width of the sensor in mm.
• Sensor Height : The height of the sensor in mm.
Advanced section
• Enable Dof : Enable or disable the Depth of Field simulation on the Cine Camera.
• X from Profile : If disabled, allow to manually update the setting even if a lens profile is used
Live Link
• World Transform : Set the transform of the component in world space or in its local
referential.
LiveLink Tracking Transform Controller
The LiveLink Tracking Transform Controller behave like a Live Link Controller driven by a Live Link Transform Role , with the normalized Zoom and Focus values accessible by blueprints. It is a basic controller letting the user creates its custom implementations.
Lens Profile
A Lens Profile is a Data asset holding various information about the optical system of a couple camera / lens.
The plugin includes some lens profiles already calibrated. Enable Show Engine Content and check the folder EZtracking/LensProfile.

• Lens Name : The name of the system, for display purpose.
• Field of View : An array of curves. Each curve is associated with a Focus step : a value
between [0; 1]. The x-axis is the Zoom value between [0; 1] and the y-axis the horizontal Field
of View in degrees.
• Sensor Width : The width of the camera sensor. The setting is used to automatically
compute minimum and maximum focal length from the field of view curves.
• Sensor Height : The height of the camera sensor.
• Nodal Offset : The nodal offset of the optical system. The x-axis of the curve is the Zoom
value between [0; 1] and the y-axis the Nodal Offset in cm from the sensor.
• Focus Distance : The x-axis of the curve is the Focus value between [0; 1] and the y-axis the
Focus Distance in cm.
• Cx : Center Shift on X axis between ]-0.5; 0.5].
• Cy : Center Shift on Y axis between ]-0.5; 0.5].
• Aperture : Not used currently. The x-axis of the curve is the Iris value between [0; 1] and the
y-axis the Aperture in f-stop.
• K1 : Quadratic coefficient for the radial distortion. Each curve is associated with a Focus step
: a value between [0; 1]. The x-axis is the Zoom value between [0; 1] and the y-axis the
coefficient.
• K2 : Quartic coefficient for the radial distortion. Each curve is associated with a Focus step : a
value between [0; 1]. The x-axis is the Zoom value between [0; 1] and the y-axis the
coefficient.
Distortion is applied on the 3D image. The formula is:

The space coordinates:
Creating a basic Lens Profile (without distortion)
You can create a basic lens profile by looking only at your lens and camera and inputting
theoretical values.
Obtaining a precise lens profile requires complex methodology, tools and experience that
we are happy to provide. Don’t hesitate to contact us: contact@oaro.studio
Lens Name
Enter the name of your lens, for example Canon HJ14ex4.3b

Sensor size
Look at the manual of your camera and enter the width and height of your sensor in mm. If you
use an adapter mount for your lens, it probably add a crop factor and you will need to adjust the
sensor size with this crop factor.
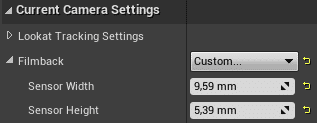
For example the sensor size of Blackmagic URSA Mini Pro 4.6K G2 is 10.55 mm x 5.93 mm when
its output resolution is set to 1920×1080. If used with a B4 mount with a crop factor of 1.1x, the
equivalent sensor size is 9.59 mm x 5.39 mm .

Warning: some cameras may crops the sensor to change formats. So the lens profile for
these camera is tied to the resolution set.
Focus distance

• Right click on the curve > Add key to None
• Set the focus on your lens to one of the tick and enter this value in the field Value (in cm)
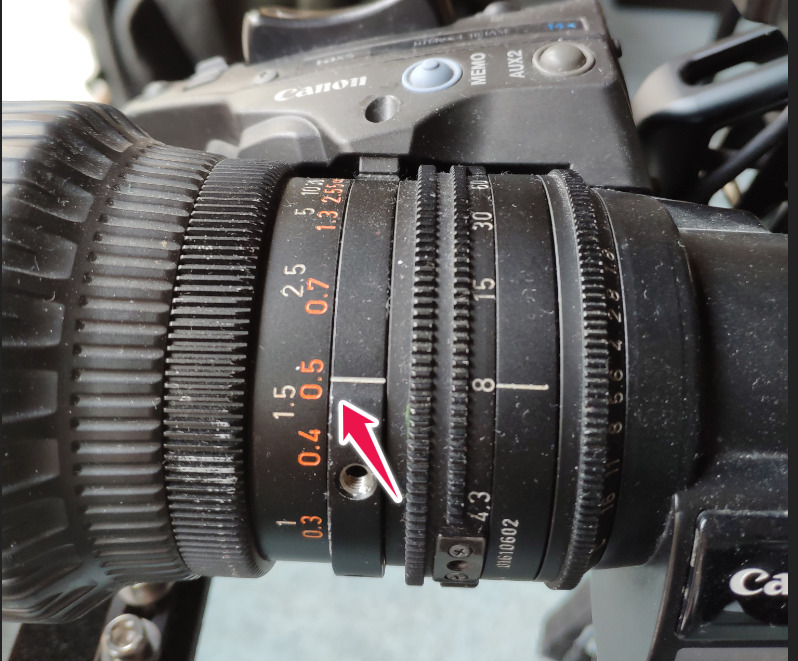
• Look at the current Focus value returned by the tracking system (normalized between [0;1])
and enter it in the field Time
Repeat this for all the focus ticks on your lens.
Field of view

Setup:
• Add a Cine Camera Actor in your scene. Set the Filmback > Sensor Width and Sensor Height
to the value entered in the sensor width and sensor height in the lens profile.
• In the lens profile, add a new element in the Field of View array. Keep the Focus value at 0.
Process:
• Right click on the curve > Add key to None
• Set the focal of your lens to one of the tick
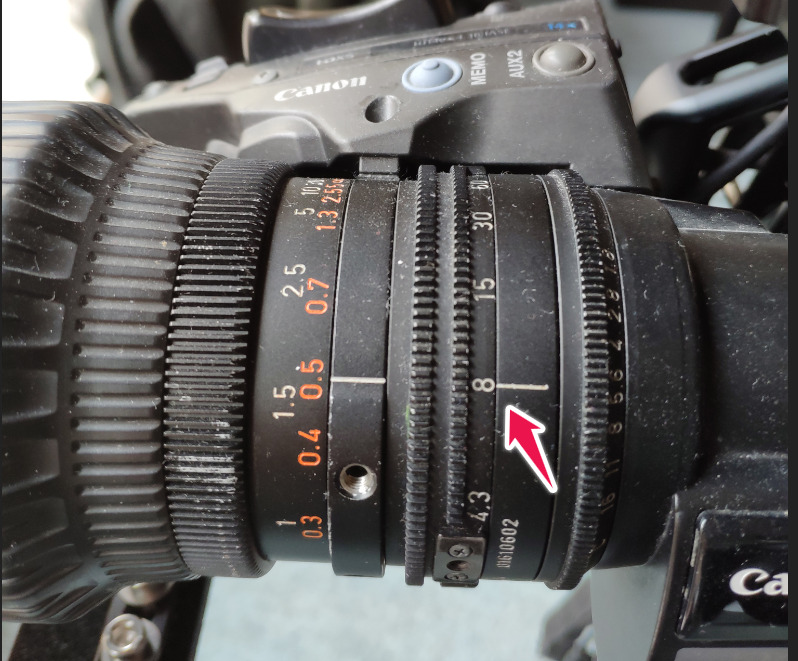
• Look at the current Zoom value returned by the tracking system (normalized between [0;1])
and enter it in the field Time
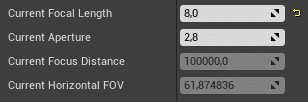
• On the Cine Camera Actor you’ve previously added, set the Current Focal Length to the
value on your tick. Look to the Current Horizontal FOV field and enter this in the Value field
of your point in your lens profile.
Repeat this for all the focal ticks on your lens.
Integration with Composure
Composure is a plugin from Epic Games aiming to make compositing a lot easier. The plugin comes with the support of acquisition video cards and a realtime compositing pipeline. Check the online documentation for more information.
The Composure plugin can be configured to use data from the EZtracking plugin and create a complete pipeline for virtual production.
- In the composure hierarchy, select the root Element.
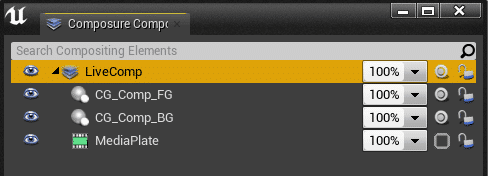
- In the details panel:
• Link the field Target Camera Actor to the camera with the Tracking component.
• In Transform Passes, replace Custom Material Pass by Compositing and Distortion Material Pass
• Link the field Cine Camera Tracked to the camera with the Tracking component.
• Set the Foreground, MediaPlate and Background Elements to the ones in the Composure hierarchy
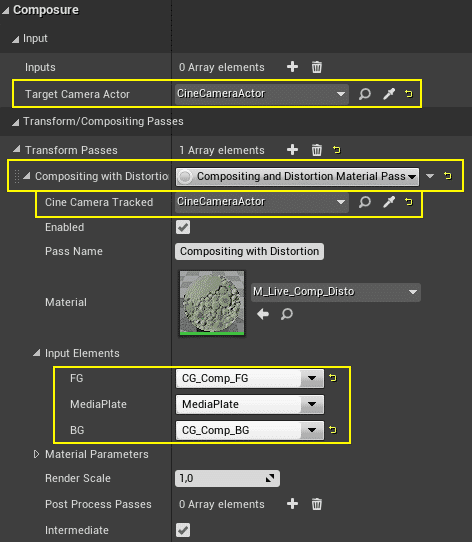
Once configured, the distortion from LiveLink Tracking Camera Controller is also applied on the 3D layers.
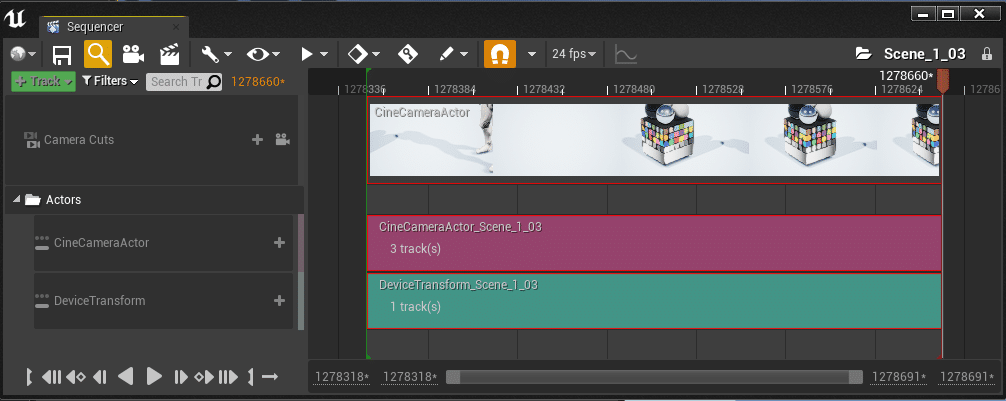
Take recording
The Take Recorder plugin can be used with Sequencer for recording tracking data. Check the online documentation for more information about the plugin.
Depending on the purpose of the recording, different source should be captured:
For replay
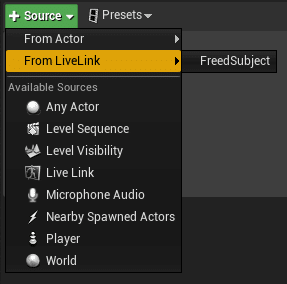
1. Open Window > Cinematics > Take Recorder.
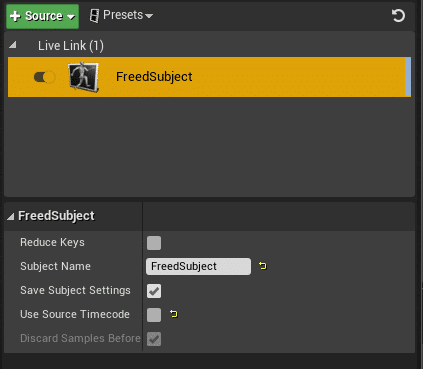
2. Click on + Source > From LiveLink > ‘YourLiveLinkSubjectName’.
3. Unset Use Source Timecode if you don’t use a timecode provider. Otherwise nothing will be recorded !
To replay the take, you just need to open your take and play it in the sequencer. The Live Link data will be re-applied to the Live Link controllers in your scene.
Timecode Provider
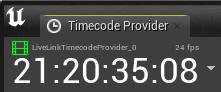
By default, the Unreal Editor generates its own timecode, based on the current system time on your computer. Using this plugin and a TCD source it’s possible to get the timecode from the tracking source.
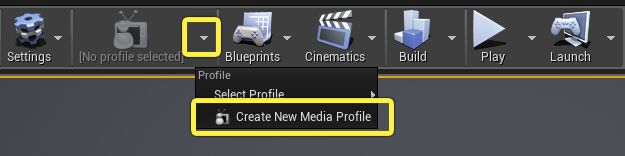
1. Add a Tracking Subject, using the TCD protocol and set the correct framerate
2. Add a media profile to your project
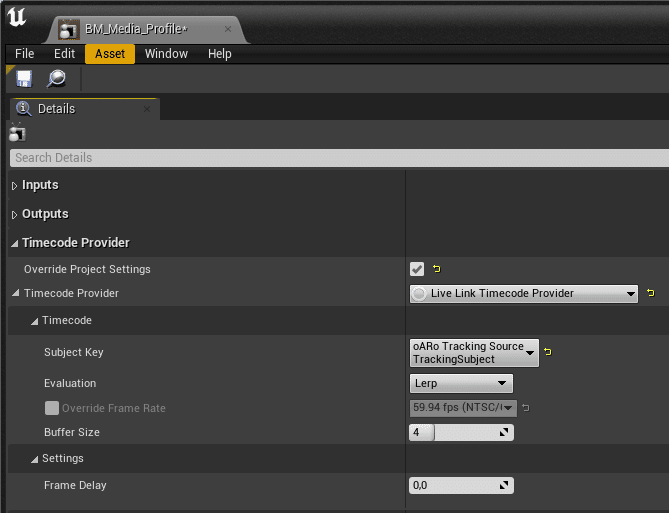
3. In the Timecode Provider section, select Live Link Timecode Provider. Then open the Timecode sub-section and select thetracking subject previously created
For export
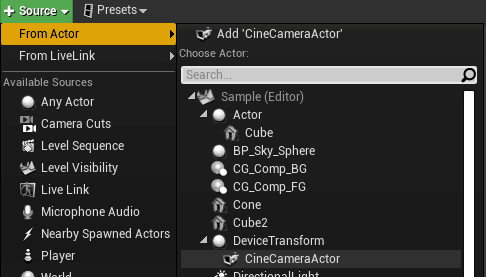
1. Open Window > Cinematics > Take Recorder.
2. Click on + Source > From Actor > ‘YourActor’ .
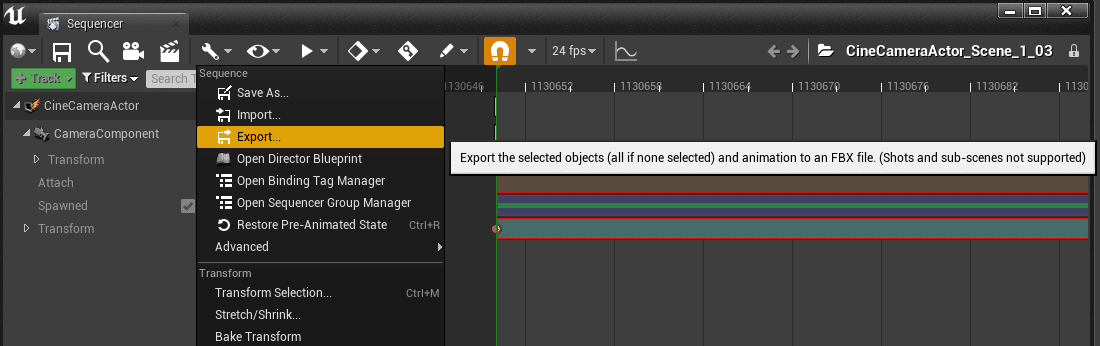
To export the take, you just need to open the sequence recorded and open each tracks you want to export. Then click on the tool icon and click on Export
Editor Settings
• To enable tracking reception in the editor (not in play mode), enable Realtime in the Viewport Options.
• To keep the editor running even when it is not in focus on the Operating System, go in Edit > Editor Preferences… > General > Performances and disable Use Less CPU when in Background.
• The editor autosaves the scene periodically, which may alter the performance. This can be disabled in Edit > Editor Preferences… > Loading & Saving > Enable AutoSave.
Additional documentation
For more insights on Live Link, you can read the following guide:
https://docs.unrealengine.com/en-US/AnimatingObjects/SkeletalMeshAnimation/LiveLinkPlugin/index.html