Start a Calibration
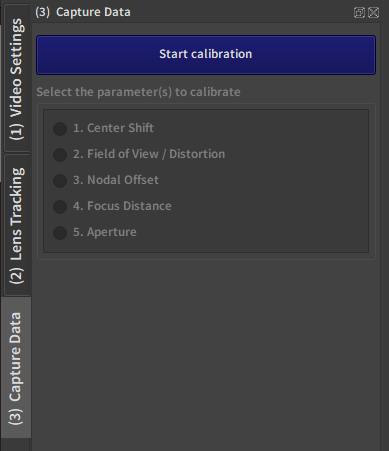
To start a calibration, press the blue Start calibration button
1. Name Selection
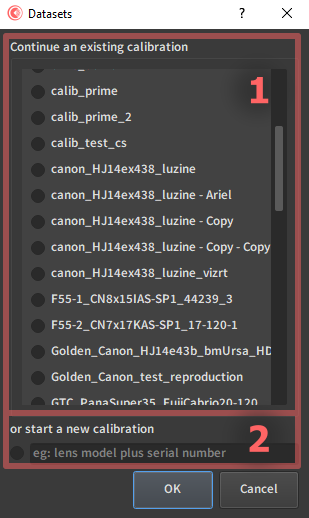
First, this window will appear. It asks you if you want to edit a previous pre-existing calibration or create a new one.
1.1. Calibrations in Root Folder
EZprofile has a Root folder where calibrations and projects get stored and loaded. It can be modified in the Preferences menu. All calibrations currently in this Root folder appear in this list. You can select one by pressing the button near its name
1.2. Create a New Calibration
Enter the new name. The radio button on the left will be selected automatically.
2. Calibration Characteristics
2.1. Lens Type
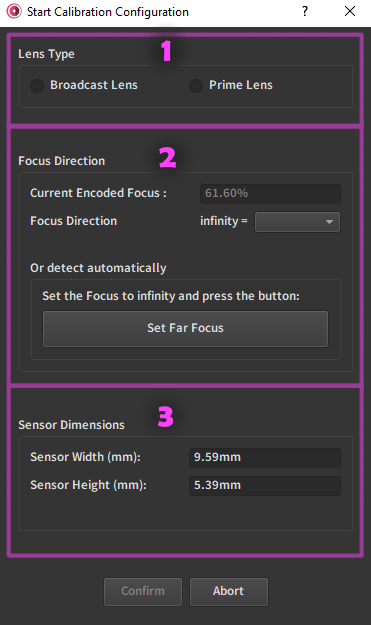
Choose the lens type between Broadcast and Prime.
Broadcast Lens
Broadcast Lenses are lens that can change their focal length in addition to the focus distance.
default preparation table:
- FOV/Disto
- 6 Zoom steps
- 4 Focus steps
- Nodal Offset
- 4 Zoom steps
- 3 Focus steps
- Focus Distance
- 10 Focus steps
Prime Lens
Prime Lenses have a fixed focal length.
default preparation table:
- FOV/Disto
- 6 Focus steps
- Nodal Offset
- 3 Focus steps
- Focus Distance
- 10 Focus steps
2.2. Focus Direction
Sometimes encoders return 0 for focus close to the camera, and sometimes for infinity focus depending on the manufacturer and rig. Also, some tracking devices can invert the focus direction of the encoder. It is important for EZprofile to know what the direction is.
Current encoded focus
The current value received from tracking for focus. This is the value that will be used by the Set far focus button to determine the direction.
Focus direction
Focus direction that will be used for this calibration. It can either be directly chosen by the user or deduced by the automatic detection.
Automatic detection
If the lens tracking is working and the Current encoded focus display is responsive to changes of focus on the lens, you can just focus to infinity and press the Set Far Focus button. if the normalized encoded value is less than 50%, infinity will be set at zero, else at one.
Danger
If you forgot to activate the tracking before starting the calibration, this value will not depend on the state of the lens and thus be erroneous. In this case look at the focus value at infinity in the tracking apparatus (ie. the EZtrack web interface) and select the direction following the same rule: if less than the middle value, 0%, if more, 100%.
2.3. Sensor Dimensions
Input the dimensions of the sensor of your camera. 9.59mm×5.39mm is the standard for broadcast cameras. For cinema camera a common format is Full-Frame(~36mm×24mm), however the exact sensor size can be a little different. If possible don't guess and look what your camera has on https://vfxcamdb.com or the website of the manufacturer. If you can't find this information, leave the default value.
Danger
In any case, the most important thing is to make sure the sensor size in the render engine is the same ! The sensor size is used to convert the lens focal length into a field of view. Since most render engines use focal length in their calibration files, the sensor size must absolutely be the same in ezprofile and the render engine for the conversion to hold.
Warning
the sensor size also affects the depth of field at equivalent field of view and aperture. If the render engine sensor size is very different from the actual camera sensor size the bokeh won't look right. You can tweak the f-stop value in the render engine to counter this visually instead of reading from the lens.
after all mendatory information has been filled out, the Confirm button will unlock. Press it to effectively start the calibration.
Back to capture workflow: Capture Workflow